

How to Create Pencil Drawing Effect in Photoshop TUTORIAL
In this tutorial, I'm going to teach you how to create a Photoshop sketch effect. You will learn how to turn your photos into amazing, avant-garde sketches. I will attempt to explicate everything in so much detail that everyone tin can create it, even those who have simply opened Photoshop for the starting time time.
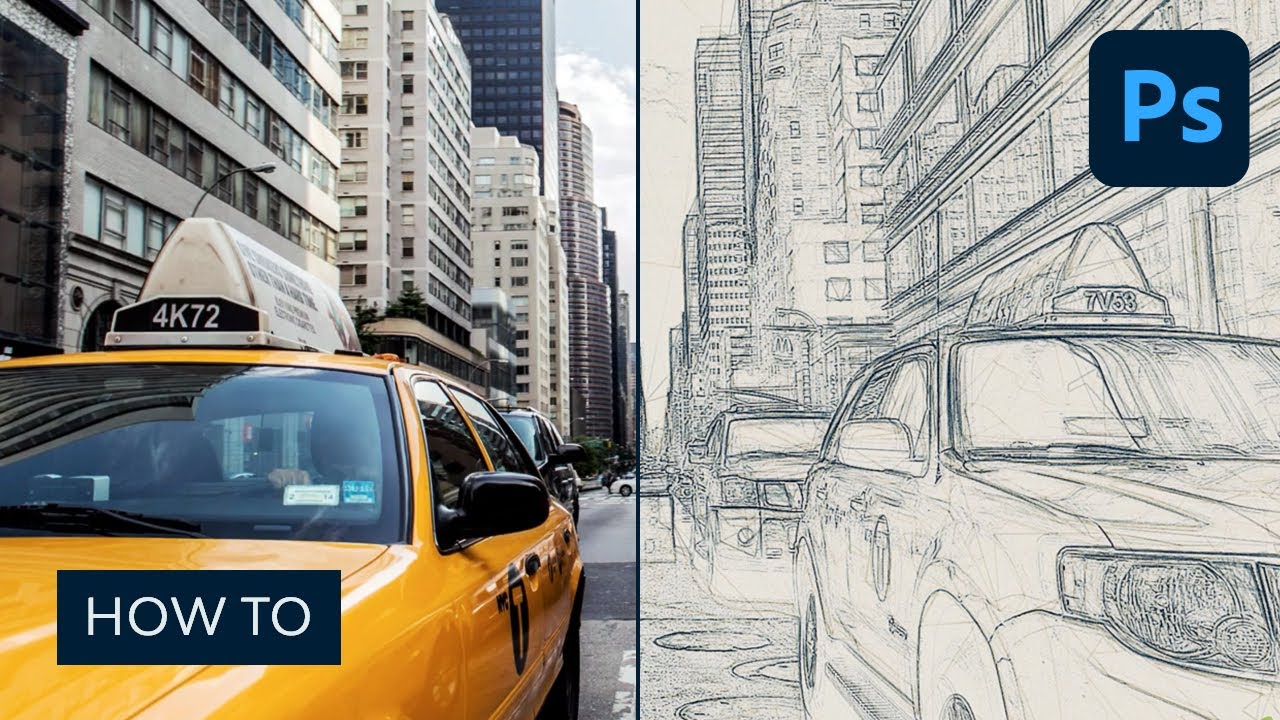
The effect shown on the left is the i I will show you how to create here in this tutorial. If y'all would like to create the effect shown on the correct, a sketch with a paint effect, and just using a single click, and then check out my TechnicalArt Photoshop Action over on Envato Elements or every bit function of a bundle on GraphicRiver.


Follow forth with us over on our Envato Tuts+ YouTube aqueduct:
What You'll Need
To recreate the blueprint to a higher place, you will need the following photograph:
- Stock Paradigm
1. Permit's Get Started
Kickoff, open the photograph that you want to work with. To open up your photograph, go to File > Open up, choose your photograph, and click Open. At present, before we go started, simply check a couple of things:
- Your photo should be in RGB Color mode, 8 Bits/Channel. To check this, go to Image > Mode.
- For best results, your photograph size should be betwixt 1500–4000 px wide/high. To cheque this, go to Image > Image Size.
- Your photo should exist theBackground layer. If it is non, go to Layer > New > Background from Layer.
- To brand some motorcar-corrections to your photograph tone, contrast, and colour, go to Image > Automobile Tone, Image > Auto Contrastand so Image > Motorcar Color.


2. How to Create the Groundwork
For the groundwork nosotros are going to use a solid color fill up. Go to Layer > New Fill Layer > Solid Colour to create a new solid colour fill layer, name it 'Background Colour' and enter the settings beneath:


3. How to Create the Base of operations Sketch
Stride ane
Now we are going to create the base sketch. Select Groundwork layer and become to Layer > New > Layer Via Copy to duplicate theBackground layer and so drag that new layer to the top of the layers in the Layers console. Press D on your keyboard to reset the swatches and get to Filter > Filter Gallery > Sketch > Photocopy and choose the settings beneath:


Step 2
Name this layer Base Sketch and change its blending mode to Multiply.


iv. How to Create a Typhoon Sketch Effect
Step 1
Now nosotros are going to create a draft sketch. Get to Layer > New > Layer Via Copy to duplicate theBase Sketch layer. Option the Lasso Tool (L), click anywhere inside the canvas, choose Gratuitous Transform, and increase the width and height to 105% as shown below:


Step 2
Proper name this layer Large Draft Sketch and fix its Opacity to 14%.


Step three
Select the Base Sketch layer and go to Layer > New > Layer Via Re-create to duplicate theBase Sketch layer once again. Pick the Lasso Tool (50), click anywhere within the canvas, choose Costless Transform, and decrease the width and height to 95% every bit shown below:


Step 4
Name this layer Small-scale Draft Sketch and set its opacity to 14%.


5. How to Create a Rough Sketch Effect
Step 1
Now we are going to create a crude sketch. Select the Background layer and go to Layer > New > Layer Via Re-create to duplicate theBackground layer, and then drag that new layer to the top of the layers in the Layers panel. Go to Filter > Filter Gallery > Artistic > Cutout and choose the settings below:


Step 2
Become to Filter > Stylize > Observe Edges and so go to Image > Adjustments > Desaturate.


Step iii
Name this layer RS_1, change its blending style to Color Burn, and drib its Opacity to 30%.


Stride 4
Now we are going to create more rough sketch layers using the aforementioned method. So repeat Step ane and Footstep 2 in this section, but in Pace i instead of using the settings we used the previous time, use the new settings below:


Stride 5
Name this layer RS_2, change its blending mode to Colour Fire, drib its Opacity to 25%, and drag it under the RS_1 layer to go along the proper layer order.


Step six
Repeat again Step 1 and Pace 2 in this chapter, only in Step 1 instead of using the settings nosotros used previously, use the new settings beneath:


Step 7
Proper name this layer RS_3, change its blending mode to Color Burn down, drop its Opacity to 20%, and drag information technology under the RS_2 layer to keep the proper layer order.


Step 8
Repeat again Step i and Step ii in this chapter, just in Step 1 instead of using the settings nosotros used previously, use the new settings below:


Pace ix
Name this layer RS_4, modify its blending mode to Color Burn, drop its Opacity to 20%, and drag it under the RS_3 layer to proceed the proper layer order.


Step ten
Repeat again Step 1 and Footstep ii in this affiliate, but in Step ane instead of using the settings we used previously, utilise the new settings below:


Step eleven
Proper noun this layer RS_5, change its blending mode to Colour Burn, drop its Opacity to 18%, and drag information technology under the RS_4 layer to proceed the proper layer order.


Step 12
Repeat again for the last time Step 1 and Step two in this affiliate, but in Step 1 instead of using the settings nosotros used previously, use the new settings beneath:


Step 13
Proper noun this layer RS_6, change its blending style to Color Burn down, drop its Opacity to 7%, and elevate it under the RS_54 layer to continue the proper layer order.


Stride fourteen
Now we are going to group all these rough sketch layers. While the layer RS_6 is selected, Shift-click on the RS_1 layer to select these two layers and all other layers between them. Then go to Layer > New > Group from Layers to create a new group from the selected layers and name it Rough Sketch.


half-dozen. How to Create Shading
Step 1
At present we are going to create some subtle shading. Select the Background layer and become to Layer > New > Layer Via Copy to duplicate theBackground layer, and so drag that new layer to the top of the layers in the Layers panel. Go to Filter > Stylize > Detect Edges and then go to Image > Adjustments > Desaturate.


Stride ii
Go to Filter > Filter Gallery > Castor Strokes > Angled Strokes and select the settings below:


Step three
Proper noun this layer Shading_1, change its blending style to Multiply, and driblet its Opacity to 12%.


Step iv
Now repeat Stride 1 in this chapter, and and then get to Filter > Brush Strokes > Crosshatch and enter the settings below:


Step v
Name this layer Shading_2, modify its blending manner to Multiply, drop its Opacity to 5%, and drag it nether the Shading_1 layer to continue the proper layer order.


vii. How to Add Noise
Stride one
In this footstep we are going to add some noise to our sketch. Select the Shading_1 layer and go to Layer > New > Layer to create a new layer and name it Noise.


Step 2
Now printing D on your keyboard to reset the swatches, go to Edit > Fill and enter the settings beneath:


Step 3
Become to Filter > Noise > Add Noise and choose the settings below:


Step four
Now modify this layer blending manner to Screen and drop its Opacity to 64%.


8. How to Create the Color Await
Step ane
Now we are going to add together a nice color look to our sketch. Go to Layer > New Adjustment Layer > Curves to create a new curves aligning layer and name information technology Color Await.


Step 2
Double click on this layer thumbnail and enter the following settings:


nine. How to Make the Final Adjustments
Step i
Now we are going to make terminal adjustments to our sketch. Get to Layer > New Adjustment Layer > Photo Filter to create a new photograph filter adjustment layer and name information technology Photo Tint.


Step two
Double click on this layer thumbnail and select the post-obit settings:


Footstep iii
Now we are going to add contrast. Press D on your keyboard to reset the swatches and get to Layer > New Adjustment Layer > Gradient Map to create a new slope map adjustment layer and proper noun information technology Overall Contrast.


Step 4
Modify this layer blending mode to Soft Light and drop the Opacity to 18%.


Pace 5
Now nosotros are going to add vibrance and saturation. Get to Layer > New Aligning Layer > Vibrance to create a new vibrance adjustment layer and name it Overall Vibrance/Saturation.


Step 6
Double click on this layer thumbnail and cull the following settings:


Stride seven
Now we are going to heave the highlights slightly. Become to Layer > New > Levels to create a new levels aligning layer and name information technology Overall Effulgence.


Footstep eight
Double click on this layer thumbnail and choose the following settings:


Step nine
At present we are going to add together sharpening. Press Command-Alt-Shift-E on your keyboard to brand a snapshot. Go to Filter > Other > High Pass and enter the settings below:


Step 10
Name this layer Overall Sharpening, change its blending fashion to Hard Lite, and driblet the Opacity to 76%.


Y'all Made It!
Congratulations, you have succeeded! Here is our final result with our Photoshop sketch effect:


Customize Your Results
You can now customize the final issue. I will give y'all a few tips:
- Select theBackground Color layer, double-click on its thumbnail, and inside theColor Picker panel choose some other colour. Click OK.
- Select some of the sketch layers and play with their opacities to create different sketch effects.
- Select theColor Look layer, double-click on its thumbnail, and inside theBackdrop panel change the settings for a different color expect.
- Select the Photograph Tint layer, double-click on its thumbnail, and within theProperties panel change the settings for a different color expect.
- Select the layer Overall Contrast and change its opacity to adjust the contrast.
- Select the layer Overall Vibrance/Saturation, double-click on its thumbnail, and inside the Properties console play with the Vibrance and Saturation values to create different results.
- Select the layer Overall Brightness, double-click on its thumbnail, and alter the settings to adjust the brightness.
- Select the layer Overall Sharpening, and alter its opacity to accommodate the corporeality of sharpening.
Hither is what I got:


Awesome Piece of work!
If you would like to create an fifty-fifty more advanced sketch with a paint consequence as shown below, and but by using a single click, then check out my TechnicalArt Photoshop Action.


The action works so that you just castor over the areas that yous want to remain in paint, play the action, and the action volition practise everything for you, giving you fully layered and customizable results.
Desire to larn more than? Check out the following sketch issue tutorials:
DOWNLOAD HERE
How to Create Pencil Drawing Effect in Photoshop TUTORIAL
Posted by: rebeccasmilley.blogspot.com

Comments
Post a Comment